How to “Insert Data From Picture” in Excel
This function allows data to be converted from picture to spreadsheet
What is the “Insert Data From Picture” Function?
The “Insert Data From Picture” button is a function that can be found on the mobile version of Microsoft Excel. Using this function will open up the camera and allow the user to take a picture of numbers or text.
This text will then be converted into spreadsheet form on Microsoft Excel. This function can be used to save countless hours of manually copying information into Excel.
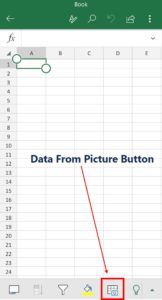
How Can I Turn A Picture Into Data on Excel?
The “Insert Data From Picture” button is located on the ribbon, at the bottom of the mobile Microsoft Excel application. It should look like this:
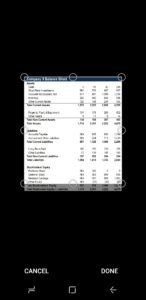
Once you press the button, your camera will open up. You will now have the option to either take a picture or choose a picture you already have on your phone. We will first try using a picture already on the phone. Here is a screenshot of a company’s balance sheet we will try to convert into a spreadsheet:

Before confirming the photo, it is important to check and make sure Excel has included the entire picture. When the above screenshot was selected in Excel, the bottom two lines had been cropped out. At the top right of the application, you have the option to crop, rotate, or filter the image.

In this case, we can select the crop button and un-crop the bottom two lines to ensure all the data is included when we convert it into the spreadsheet form.
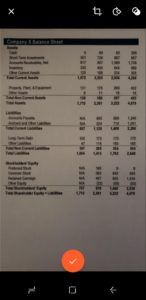
After confirming the image, Excel will give you a chance to preview the spreadsheet. This preview will also highlight any issues the application had when trying to recognize the data. At the top of the screen, it will tell you how many items need to be reviewed. At the bottom of the screen, you will be given the option to either ignore or edit each of these items. You may also select cells that are not highlighted if you would like to edit them.
Below we can see that when we imported the above image, Excel had issues with 11 items:

Many of the items that Excel highlighted were actually not problems. One small issue was that Stockholders’ Equity and Preferred Stock were on the same line. Another is that the word “other” was recognized as “offer”. This function is extremely helpful and can be used to quickly import data, however, it is not perfect. Upon carefully reviewing each cell, there were two errors that Excel did not pick up on and highlight. One instance of the word “Liabilities” had a space in it. Also, one instance of the “N/A” was detected as “NIA”. These minor errors can be edited during this step by selecting the cell and clicking edit. Alternatively, you can make these edits after importing the data into the spreadsheet. The last step to import the data after reviewing all items is to press Insert.

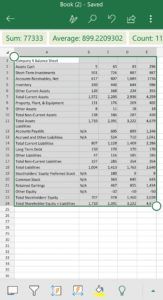
Once you have pressed Insert, the data should be presented as a spreadsheet in Excel.

Let us now use the “Insert Data From Picture” function using the actual camera, rather than an uploaded screenshot. Open the Excel application and again click on the “insert Data From Picture” button. The camera will open up allowing us to take a picture. Below is a picture taken using this function. This is a paper copy of the same balance sheet we used before.
Click the checkmark and you will again be brought to the review screen. In this case, the application found 14 possible errors.

In this case, there are even fewer actual errors than when we used the screenshot. The only error, in this case, was that Stockholders’ Equity and Preferred Stock were on the same line again. Click insert once again, and the data will be imported into a spreadsheet on Excel.
If you would like to learn more about using Microsoft Excel, check out CFI’s free Excel Crash Course!
Video Tutorial – How to Insert Data From Picture in Excel
To learn more about How to Insert Data From Picture in Excel, check out the video below:
Additional Resources
Thank you for reading CFI’s guide on how to convert a picture into an Excel spreadsheet using the “Insert Data From Picture” function. For additional articles check out some of CFI’s other resources:
Excel Tutorial
To master the art of Excel, check out CFI’s Excel Crash Course, which teaches you how to become an Excel power user. Learn the most important formulas, functions, and shortcuts to become confident in your financial analysis.

Launch CFI’s Excel Crash Course now to take your career to the next level and move up the ladder!