Gridlines in Excel
How to work with gridlines in Excel
What are Gridlines in Excel?
Gridlines in Excel[1] are the horizontal and vertical gray lines that differentiate between cells in a worksheet. The gridlines guide users to differentiate between the specific cells and read the data in an organized manner. They also help users navigate through the worksheet columns and rows with ease.
Without gridlines, users would face difficulties reading the data due to the lack of organization. Also, most users confuse gridlines with cell borders, which are applied to specific regions of the worksheet. Unlike borders, gridlines are visible on the entire worksheet and cannot be applied to a specific region of the worksheet compared to the borders. Also, when printing a worksheet, the gridlines are not printed on the paper, whereas any borders applied to the worksheet appear on printed worksheets.
Understanding Excel Gridlines
Gridlines in Excel apply, by default, in the whole worksheet or workbook, and cannot be applied to a specific section of the worksheet. If you want to make a certain section of the worksheet different from the rest, use border lines to make customizations to specific cells or group of cells.
Gridlines are displayed in a workbook using a grey color that is applied automatically. If you want o change the gridline colors, Go to the File tab, Options, Advanced and then click Grid Color. Select the color you want to use and then go back to the worksheet.
The “Remove Gridlines” setting is specific to each worksheet, and removing gridlines from the entire worksheet will still be visible in other worksheets in the workbook.
How to Remove Excel Gridlines
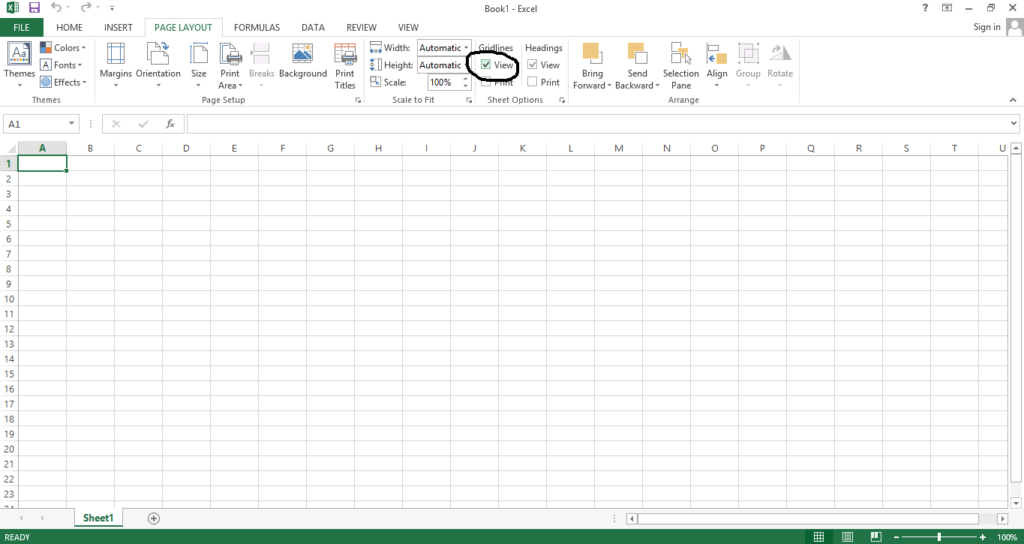
The easiest way to remove gridlines in Excel is to use the Page Layout tab. Click the Page Layout tab to expand the page layout commands and then go to the Gridlines section. Below Gridlines, uncheck the view box.
The keyboard shortcut option to remove the gridlines is to press Alt and enter W, V, G. The command will remove the gridlines if they are visible or make the gridlines visible if they are not visible.
Click the button below to download our free Excel Keyboard Shortcuts Cheat Sheet!
You can also use the following options to remove the gridlines:
1. Remove gridlines by applying background fill
Another way to remove gridlines is to use the Fill Color feature. You can apply a fill color to a specific region of the worksheet or to the entire worksheet and the gridlines will disappear.
If you want to apply the Fill Color feature to the entire worksheet, click Ctrl+A to select all the cells in the worksheet. Then, go to the Home tab then to the Font group and open Font Color in the dropdown list. Choose color “White” from the list. Applying a white background hides the gridlines but shows the cell data. If you want to make the gridlines visible again, repeat the same procedure but pick the No Fill option under the Font group.
2. Remove gridlines from multiple worksheets
By default, removing gridlines only applies to the specific worksheet and not to other open worksheets within the workbook. For the command to apply to all worksheets, you must first select all the worksheet tabs before removing the gridlines.
Start by holding the Control button and selecting all the worksheets to put the worksheets in group mode. Then, use the Fill Color feature or uncheck the “View” option under the Page Layout tab to remove gridlines.
Once you have completed making the changes, ungroup the worksheets by right-clicking on the tab and selecting the Ungroup option. If the pages remain grouped, it means that any changes made to the current worksheet will apply to all the selected worksheets.
How to Change the Color of Excel Gridlines
By default, the gridlines in Excel come with a faint gray color. You can change the default color to any of your preferred colors by following the steps below:
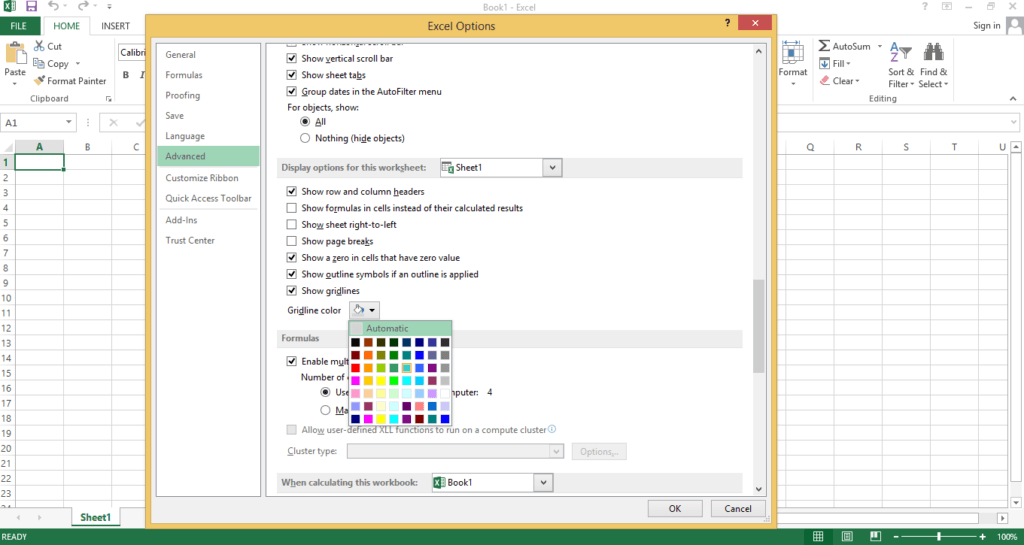
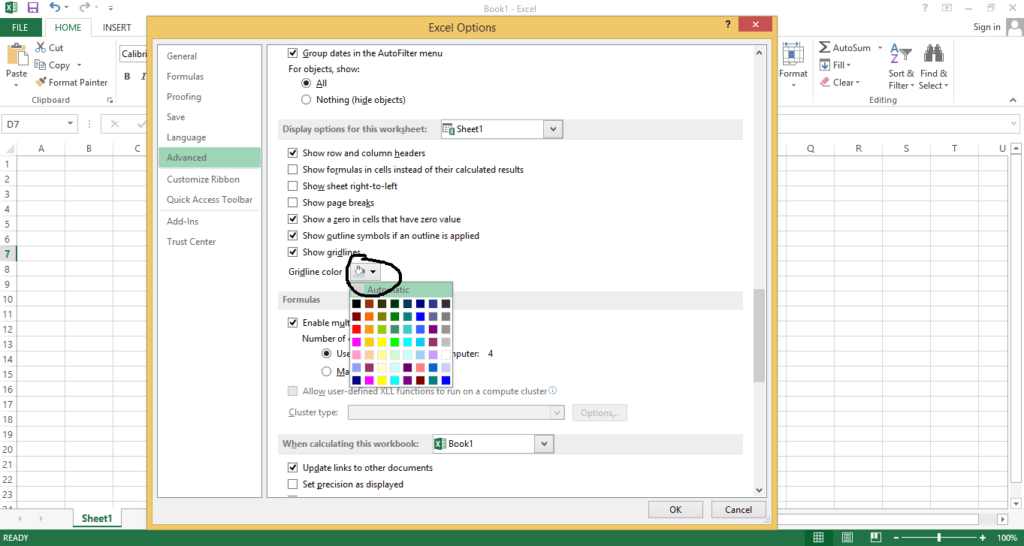
- Click File in the top left corner, then go to Options.
- In the Excel Options dialog box that opens, click Advanced on the left panel.
- Scroll down to the Display Options section. At the bottom of this section, use the Gridline color box to expand the dropdown list.
- Choose your preferred gridline color and then click OK at the bottom to close the Options dialog box.
The above steps only apply to the current Excel worksheet and not to the entire workbook. If you want to change colors for all the worksheets, you must group the worksheets by holding the “Ctrl” key and selecting all the tabs. If you change the color while the worksheets are in group mode, the change will apply to all the selected worksheets.
Once you’ve completed making the changes, remember to ungroup the worksheets else any changes made to the current worksheet will apply to all other selected worksheets.
Connect what you just learned to a clear career path with CFI’s role‑based courses and certification programs.
Additonal Resources
Thank you for reading CFI’s guide to Gridlines in Excel. To keep advancing your career, the additional resources below will be useful:
- Free Excel Crash Course
- Excel and Financial Modeling Templates
- List of Excel Functions
- Types of Graphs
Article Sources
Excel Tutorial
To master the art of Excel, check out CFI’s Excel Crash Course, which teaches you how to become an Excel power user. Learn the most important formulas, functions, and shortcuts to become confident in your financial analysis.

Launch CFI’s Excel Crash Course now to take your career to the next level and move up the ladder!