Get Certified for Financial Modeling (FMVA)®
Gain in-demand industry knowledge and hands-on practice that will help you stand out from the competition and become a world-class financial analyst.
Time-saving ways to insert formulas into Excel
Excel formulas are how Excel performs calculations, from simple sums to more advanced analysis. This guide walks through basic Excel formulas for beginners, explaining operators, cell references, and a few essential functions you can start using right away.
Every spreadsheet formula in Excel follows a structured format:
For example, instead of manually adding a column of values, the SUM function (=SUM(A1:A10)) instantly calculates totals. Similarly, an IF statement (=IF(A1>100, “Above Target”, “Below Target”)) automates decision-making in financial reports.
Excel formulas eliminate repetitive manual calculations, allowing professionals to perform complex calculations in Excel with greater accuracy in financial modeling, reporting, and valuation. Whether you work in finance, accounting, or data science, mastering Excel’s built-in functions enhances data integrity, speed, and precision. As you learn Excel formulas, you gain the ability to automate workflows and analyze data more efficiently.
Excel spreadsheet formulas are essential for finance, accounting, and business analytics, allowing professionals to perform calculations, automate workflows, and analyze large datasets with precision. From financial modeling to risk assessment, these functions enhance reporting accuracy, improve decision-making efficiency, and reduce manual errors.
Mastering Excel ensures greater efficiency and precision in corporate finance and investment analysis, whether using the SUM function to total financial data or applying VLOOKUP for reconciliations.
Mastering basic Excel functions is critical for beginners to become highly proficient in financial analysis. Microsoft Excel is considered the industry standard piece of software in data analysis. Microsoft’s spreadsheet program also happens to be one of the most preferred software by investment bankers and financial analysts in data processing, financial modeling, and presentation. This guide will provide an overview and list of some basic formulas for Excel.
There are two basic ways to perform calculations in Excel: Formulas and Functions.
In Excel, a formula is an expression that operates on values in a range of cells or a cell. For example, =A1+A2+A3, which finds the sum of the range of values from cell A1 to cell A3.
Functions are predefined formulas in Excel. They eliminate laborious manual entry of formulas while giving them human-friendly names. For example: =SUM(A1:A3). The function sums all the values from A1 to A3.
There are five common ways of inserting basic Excel formulas when analyzing data. Each strategy comes with its own advantages. Therefore, before diving further into the main formulas, we’ll clarify those methods so you can create your preferred workflow earlier on in the process.
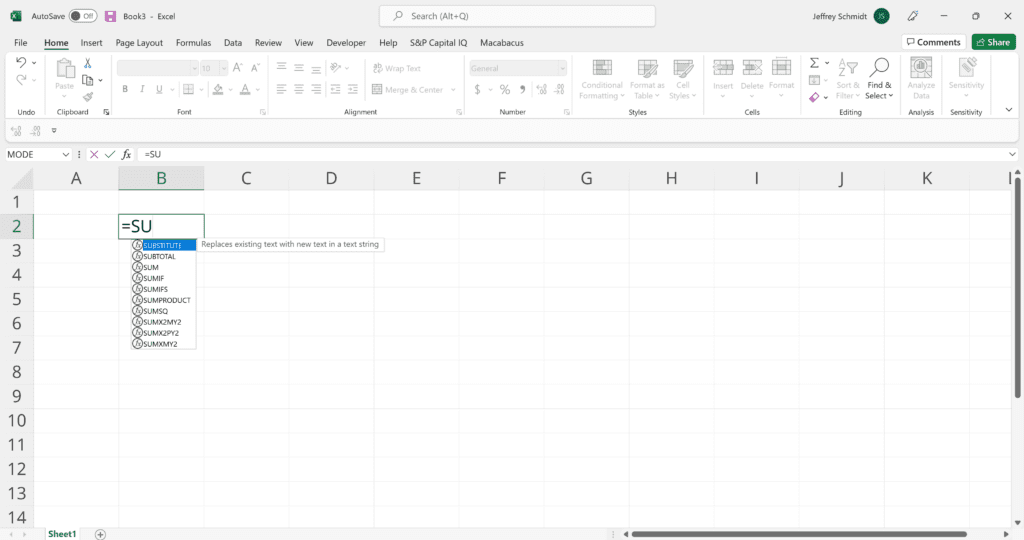
Typing a formula in a cell or the formula bar is the most straightforward method of inserting basic Excel formulas for beginners. The process usually starts by typing an equal sign, followed by the name of an Excel function.
Excel is quite intelligent in that when you start typing the name of the function, a pop-up function hint will show (see below). From this list, you’ll select your preference. However, don’t press the Enter key after making your selection. Instead, press the Tab key, and Excel will automatically fill in the function name.
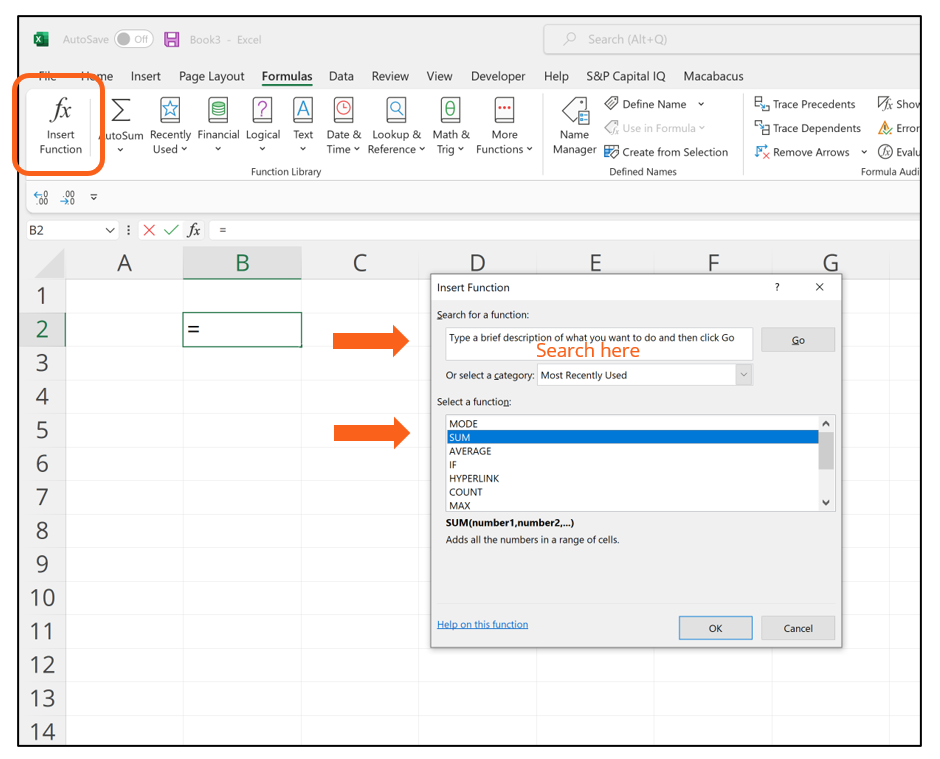
If you want full control of your function’s insertion, using the Excel Insert Function dialog box is all you ever need. To achieve this, go to the Formulas tab and select the first menu labeled Insert Function. The dialogue box will contain all the functions you need to complete your financial analysis.
Example of how to use the Insert Function option in Excel:
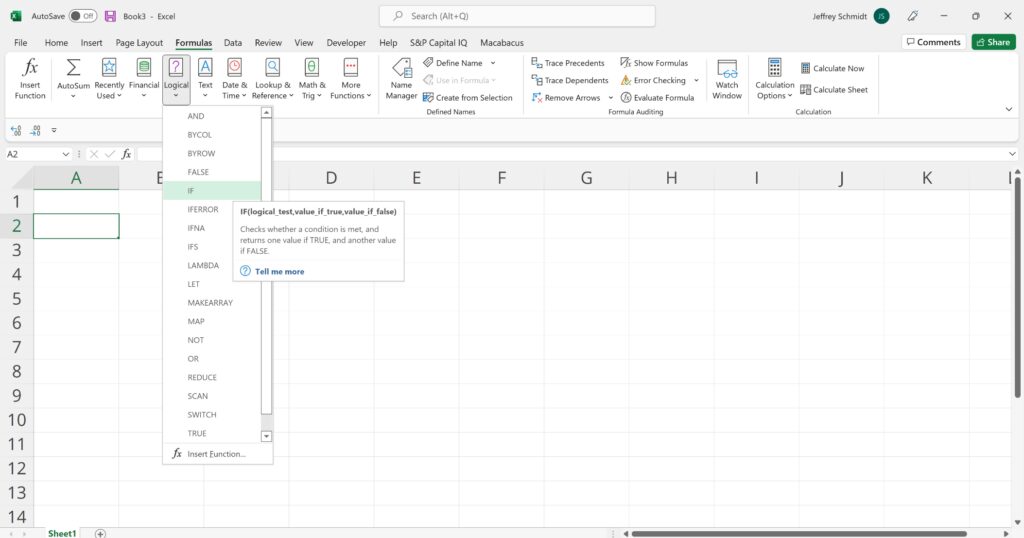
This option is for those who want to quickly delve into their favorite functions. To find this menu, navigate to the Formulas tab and select your preferred group. Click to show a sub-menu filled with a list of functions.
From there, you can select your preference. However, if your preferred group is not on the tab, click on the More Functions option—it’s probably hidden there.
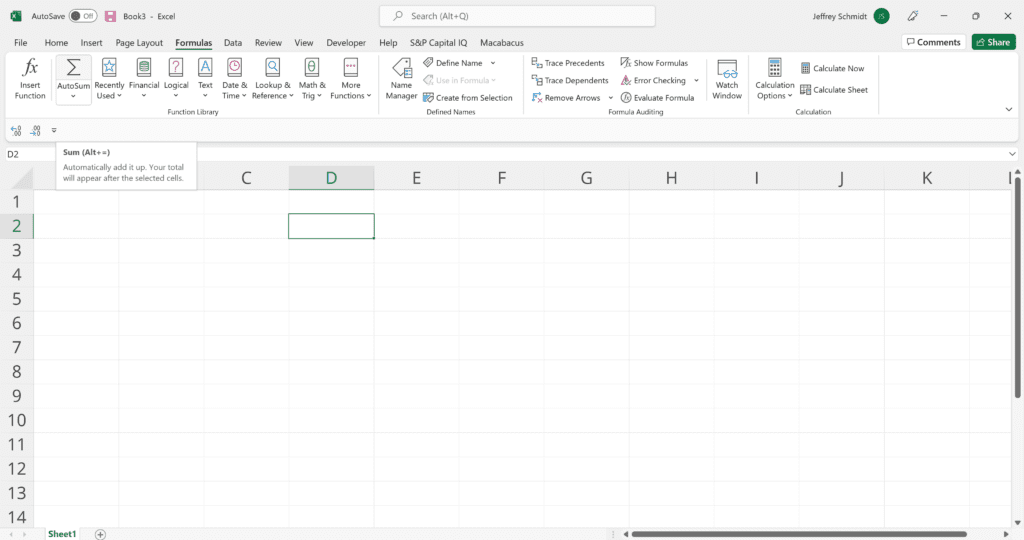
For quick and everyday tasks, the AutoSum function is your go-to option. Navigate to the Formulas tab and click the AutoSum option. Then click the caret to show other hidden formulas. This option is also available in the Home tab.
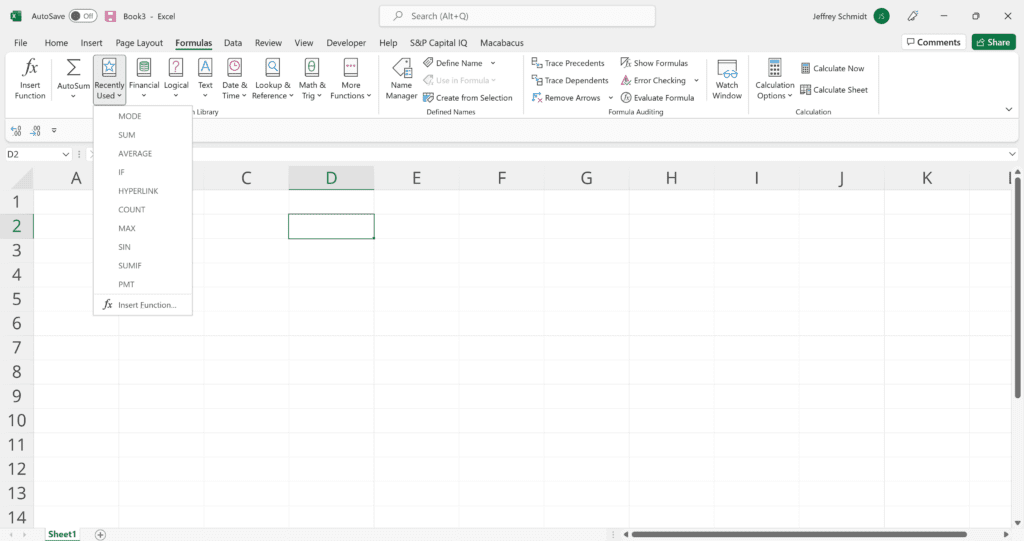
If retyping your most recent formula is a monotonous task, use the Recently Used selection. It’s on the Formulas tab, a third menu option just next to AutoSum.
Common operators in Excel=A1 + B1 adds two numbers.
Excel identifies each cell by a column letter and row number, such as A1 or C5.
For example, =A1 + B1 tells Excel to add whatever values are currently stored in cells A1 and B1.
Beginners mostly use relative references, but absolute references become important when you need to keep a specific cell (like a tax rate or discount rate) constant in a formula.
Now that you know how to insert functions, here are Excel formula examples for beginners to get started:
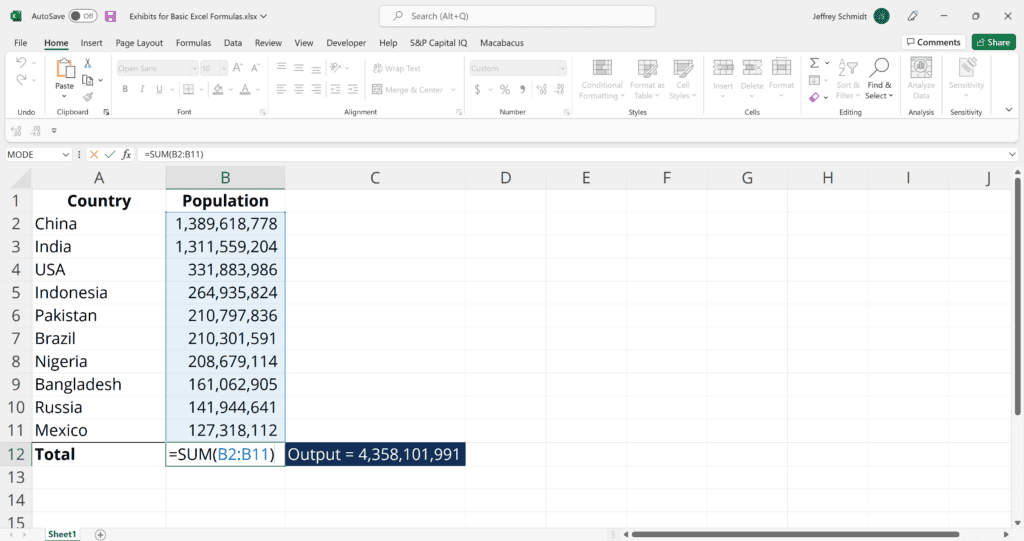
The SUM function is the first must-know formula in Excel. It usually aggregates values from a selection of columns or rows from your selected range.
=SUM(number1, [number2], …)
Example:
=SUM(B2:G2) – A simple selection that sums the values of a row.
=SUM(A2:A8) – A simple selection that sums the values of a column.
=SUM(A2:A7, A9, A12:A15) – A sophisticated collection that sums values from range A2 to A7, skips A8, adds A9, jumps A10 and A11, then finally adds from A12 to A15.
=SUM(A2:A8)/20 – Shows you can also turn your function into a formula.
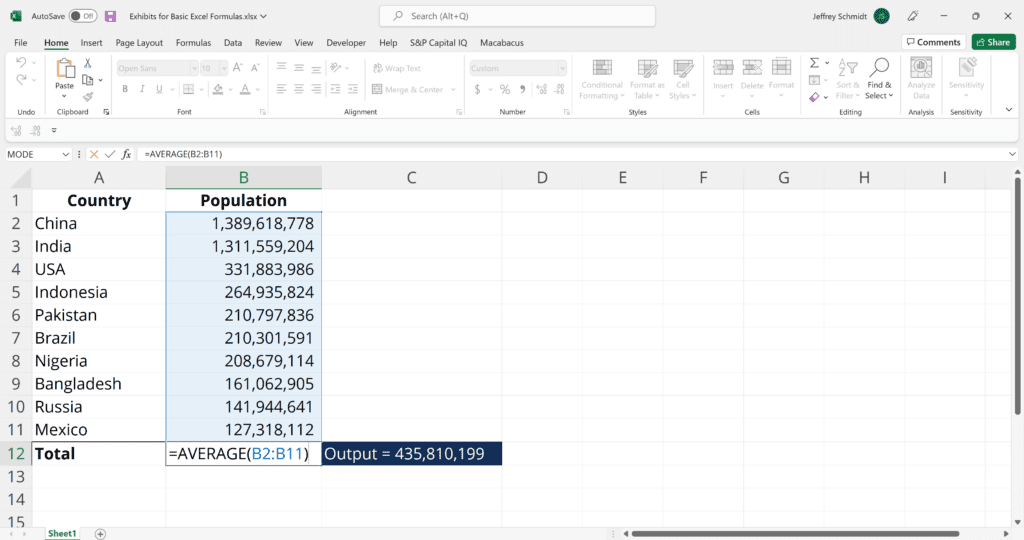
The AVERAGE function should remind you of simple averages of data, such as the average number of shareholders in a given shareholding pool.
=AVERAGE(number1, [number2], …)
Example:
=AVERAGE(B2:B11) – Shows a simple average, also similar to (SUM(B2:B11)/10)
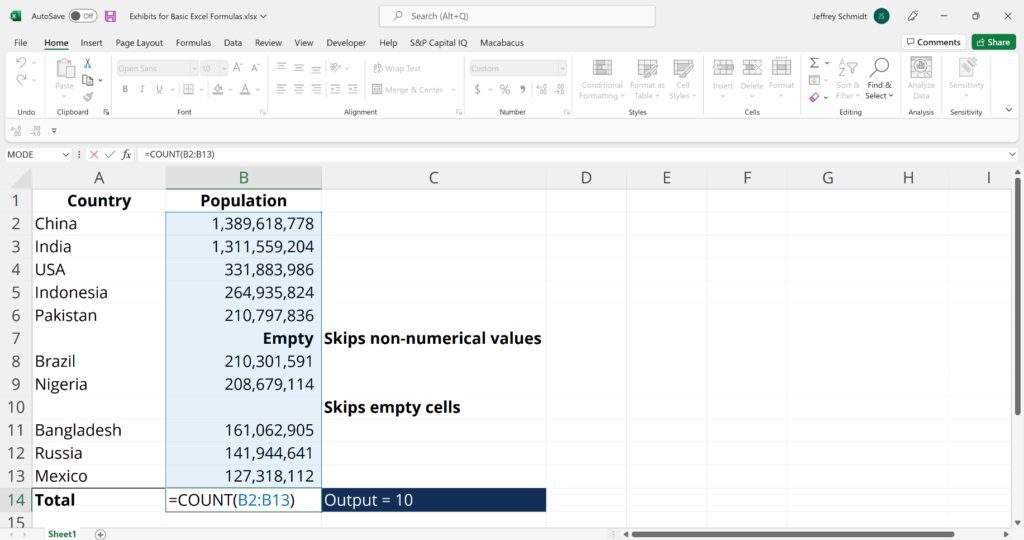
The COUNT function counts all cells in a given range that contain only numeric values.
=COUNT(value1, [value2], …)
Example:
COUNT(A:A) – Counts all values that are numerical in A column. However, you must adjust the range inside the formula to count rows.
COUNT(A1:C1) – Now it can count rows.
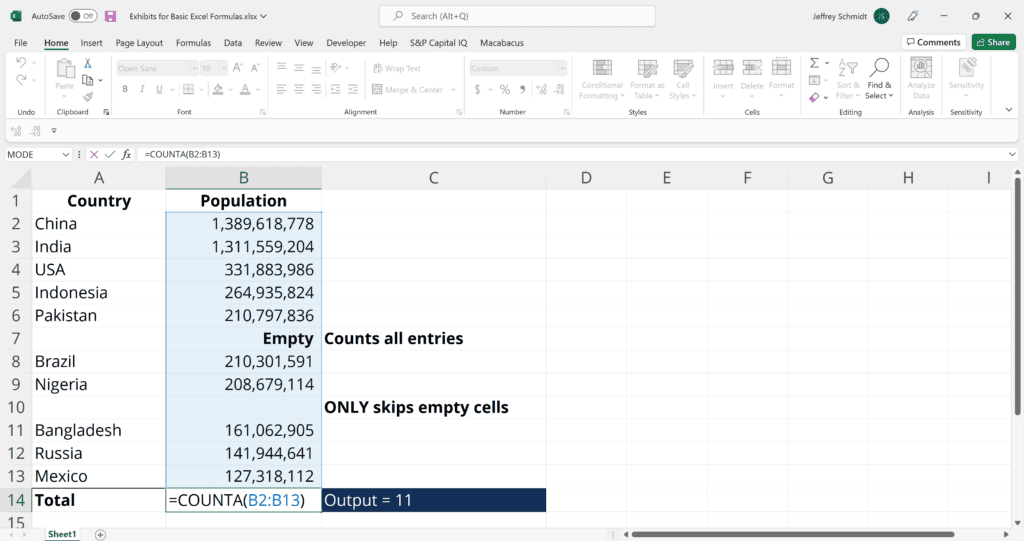
Like the COUNT function, COUNTA counts all cells in a given range. However, it counts all cells regardless of type. Unlike COUNT, which only counts numerics, it also counts dates, times, strings, logical values, errors, empty string, or text.
=COUNTA(value1, [value2], …)
Example:
COUNTA(C2:C13) – Counts rows 2 to 13 in column C regardless of type. However, like COUNT, you can’t use the same formula to count rows. You must make an adjustment to the selection inside the brackets – for example, COUNTA(C2:H2) will count columns C to H
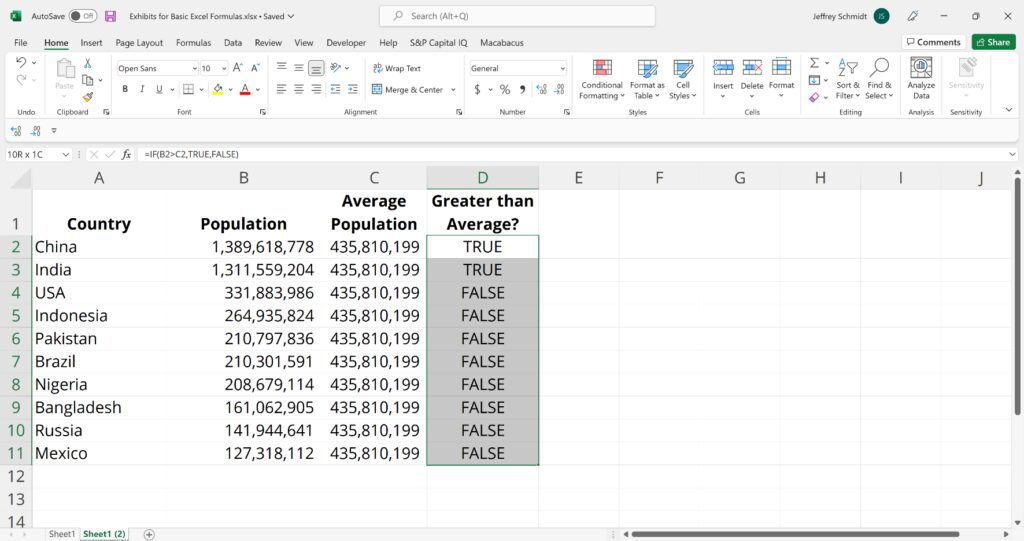
The IF function is often used when you want to sort your data according to a given logic. The best part of the IF formula is that you can embed formulas and functions in it.
=IF(logical_test, [value_if_true], [value_if_false])
Example:
=IF(C2<D3,“TRUE”,”FALSE”) – Checks if the value at C3 is less than the value at D3. If the logic is true, let the cell value be TRUE, otherwise, FALSE
=IF(SUM(C1:C10) > SUM(D1:D10), SUM(C1:C10), SUM(D1:D10)) – An example of a complex IF statement. First, it sums C1 to C10 and D1 to D10, then it compares the sum. If the sum of C1 to C10 is greater than the sum of D1 to D10, then it makes the value of a cell equal to the sum of C1 to C10.
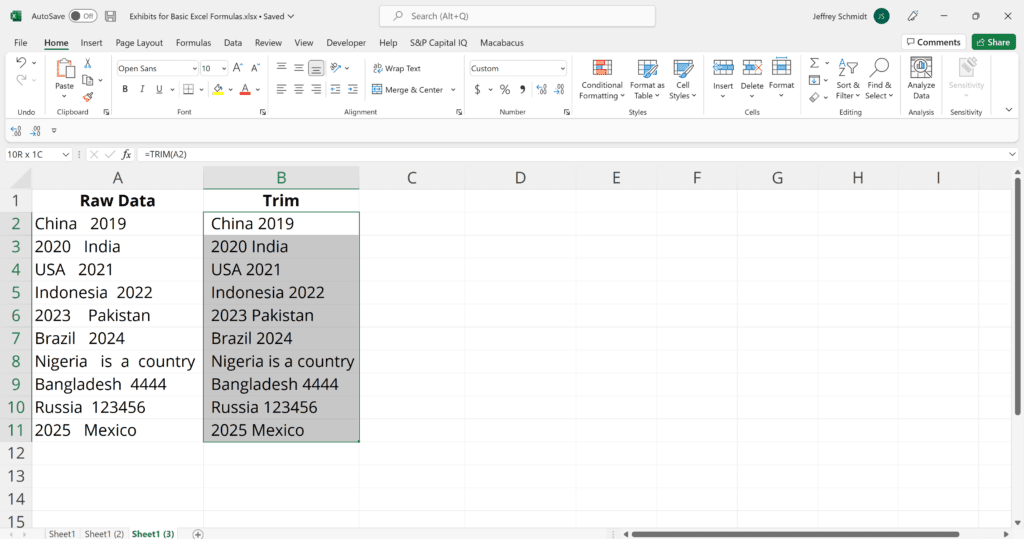
The TRIM function makes sure your functions do not return errors due to extra spaces in your data. It ensures that all empty spaces are eliminated. Unlike other functions that can operate on a range of cells, TRIM only operates on a single cell. Therefore, it comes with the downside of adding duplicated data to your spreadsheet.
=TRIM(text)
Example:
TRIM(A2) – Removes empty spaces in the value in cell A2.
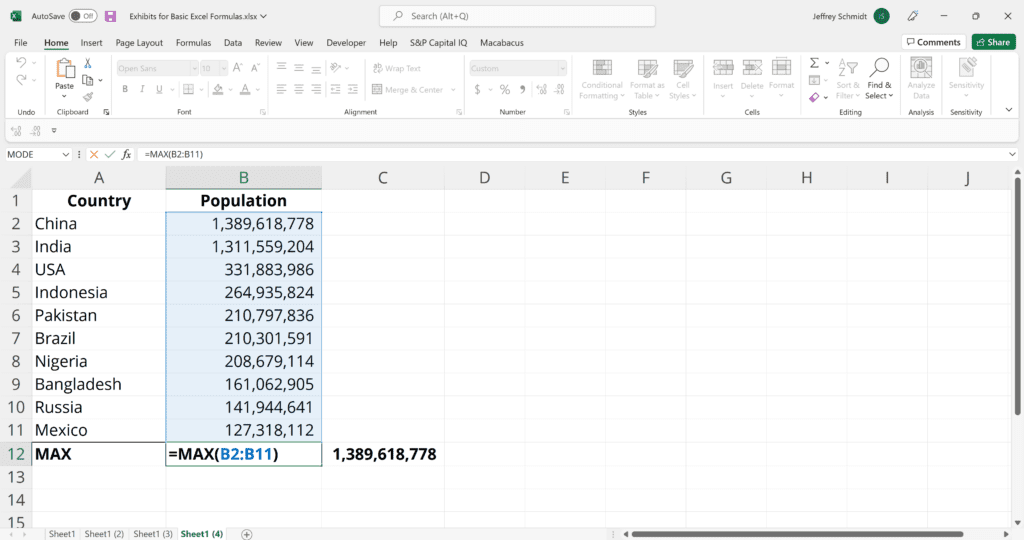
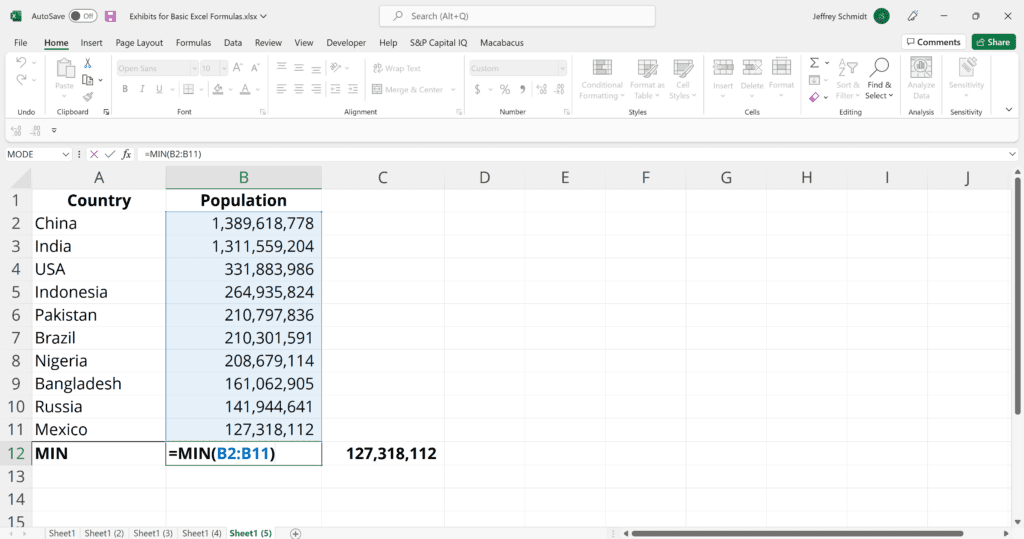
The MAX and MIN functions help find the maximum and minimum numbers in a range of values.
=MIN(number1, [number2], …)
Example:
=MIN(B2:C11) – Finds the minimum number between column B from B2 and column C from C2 to row 11 in both columns B and C.
=MAX(number1, [number2], …)
Example:
=MAX(B2:C11) – Similarly, it finds the maximum number between column B from B2 and column C from C2 to row 11 in both columns B and C.
Connect what you just learned to a clear career path with CFI’s role‑based courses and certification programs.
Thank you for reading CFI’s guide to basic Excel spreadsheet formulas for beginners. To continue your development as a world-class financial analyst, these additional CFI resources will be helpful: